In some cases you need to export huge number of contents from oracle UCM instance and import them into deferent offline UCM instance server without using replication or transferring data because you don't have any connection to that server and also you need to link these contents to deferent folder structure, new security group, new account with new privileges.
All these points can be done easily and it will be very useful if you are configuring new test environment with new structure and you need a real data from your production server.
First let say we need to export contents from (server 1) to (server 2), where
server 1 is the production server, and Server 2 is our offline target server.
In this instruction we will use two main steps
1. Export contents from Server 1
2. Import contents to Server 2
----------------------------------------------------------------------------------------
Instruction:
1. Export content from Server 1:
- Go to Administration - Admin Applet - Archiver
- Click on Edit - Add

- Add new name for your Archive name, let say (Export_Contents), you can
add a description, then click OK.

- Be sure that Copy Web Content option is Yes from Export Option.

- Now from (Export Data) Tab, Click on Edit in the Export Query screen.

- After you click Edit, we will add our export query to get the exact
contents that we need from server 1, in my scenario I will add a query
using Folder Xcollection ID that contain my data, you can add any query
you need depend on your data, After that Click OK.

- Right Click on your archive name and click Export, Don't Click on Delete
revision after successful archive, and Click OK.

- After your Export Finished Successfully, go to this location:
...\Middleware\user_projects\domains\base_domain\ucm\cs\archives
You will find your archive name folder their which in our scenario
(Export_Contents), Copy this folder to the same path in Server 2 to
begin our import process.

----------------------------------------------------------------------------------------
2. Import contents to Server 2
- First we need to copy (Export_Contents) folder from Server 1 as we
mentioned before and paste this folder on the same location in Server 2,
...\Middleware\user_projects\domains\base_domain\ucm\cs\archives
Very Important Notes before Import:
If you don't do these points the indexer will abort the new contents
and it will not be imported, with a message "import failed with too
many errors"
1. You need to create the same Security Group name and Content
Type and meta data that was linked with the exported contents from
Server 1 and add them in Server 2, then give the new Security Group in
Server 2 a full permission on this Security Group so when you import
these contents it will be assigned to the new one and it will be mapped
into the new account under new folder structure with no problems.
2. After you copy the archive Folder (Export_Contents) to Server 2, under
...\Middleware\user_projects\domains\base_domain\ucm\cs\archives
and then open the Archiver Utility to import this archive folder, you will
not see this archive name in your list, that because it's a deferent
instance so you must add this archive name manually from
collection.hda file, which located in the same path of the archive folder.

3. Open collection.hda file using a text editter, and add the name of your
archive folder name manually, and don't forget to add the same
description on the second line before the (@end) command, if you don't
want to add description you must keep (Enter) space between the
archive name and the (@end) command as you can see in figure1 and
figure2.
Figure 1 (With Description)

Figure 2 (Without Description)
 4. After you finished these points, open the Archiver again from Server 2 now you can see your archive folder name and begin Import process.
Proceed now with our Import Process:
- First we need to add the mapping Query after select your archive name.
- Click on Import tab - Content - Value Map Click Edit
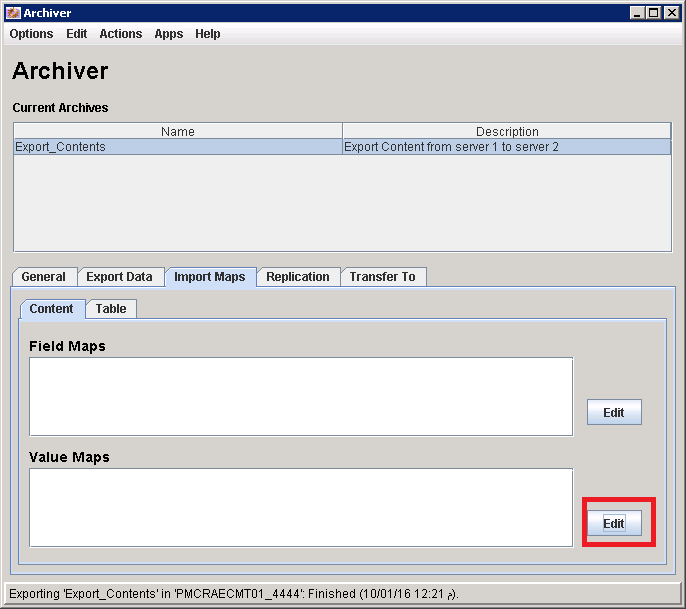
- A Dialog box will appeared called "Edit Value Maps", here you can add your
query map value into your target server (i.e Server 2), in my scenario I
will check all contents into a new specific folder using a new Xcollection ID
as you can see in the figure.

- Final step right click on your archive name, Click on Import.

After your Import Successfully finished, all Contents move to the new instance, new folder structure, new security group and accounts with new privileges and finally all contents are indexed and released.
Enjoy,
Mohammad K. Faidi"Think Positive"
No comments:
Post a Comment