In a high availability environment such as the one shown in the figure bellow, it is recommended that Oracle ECM products be set up in a clustered deployment, where the clustered instances access an Oracle Real Applications Cluster (Oracle RAC) database content repository and a shared disk is used to store the common configuration.

A hardware load balancer routes requests to multiple Oracle HTTP Server instances which, in turn, route requests to the clustered Oracle ECM servers.
This Post include the following topics:
1. Shared Storage
2. Configuring the Oracle Database
3. Installing and Configuring ECMHOST1
4. Installing and Configuring WEBHOST1
5. Configuring the Load Balancer
6. Installing and Configuring ECMHOST2
7. Installing and Configuring WEBHOST2
The configuration will include Oracle UCM Product.
Now in Steps one by one:
1. Shared Storage:
Cluster members require shared storage to access the same configuration files. This should be set up to be accessible from all nodes in the cluster.
When configuring Oracle UCM clusters, follow these requirements:
For Oracle UCM clusters, all members of the cluster must point to the same configuration directory. This directory must be on a shared disk accessible to all members of the cluster.
----------------------------------------------------------------------------------------
2. Configuring the Oracle Database:
Configure the Oracle RAC database before completing this procedure.
To run RCU and create the Oracle UCM schemas in an Oracle RAC database repository, follow these steps on any available host:
- Issue this command in the command line: RCU_HOME/bin/rcu
- On the Welcome screen, click Next.

- On the Create Repository screen, select the Create operation to load
component schemas into an existing database and Click Next.

- On the Database Connection Details screen, enter connection information for
the existing database as follows:
. Database Type: Oracle Database
. Host Name: Name of the computer on which the database is running. For
an Oracle RAC database, specify the VIP name or one node name,
Example: ECMDBHOST1-VIP or ECMDBHOST2-VIP
. Port: The port number for the database. Example: 1521
. Service Name: The service name of the database.
Example: ecmha.mycompany.com
. Username: SYS
. Password: The SYS user password
. Role: SYSDBA
. Click Next
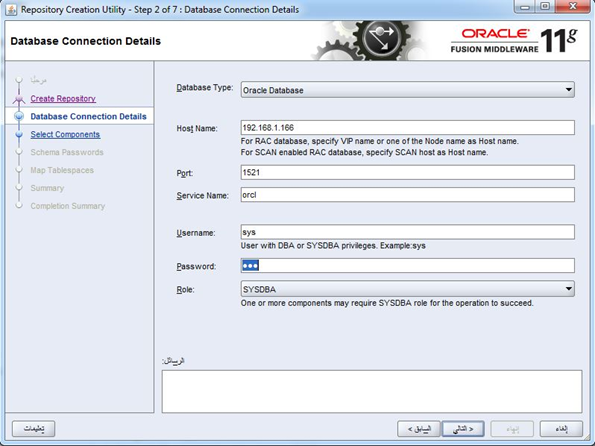
Note: If you entered everything correctly, a dialog box will display with the
words "Operation Completed." If so, click OK. If not, you will see an
error under Messages, such as "Unable to connect to the database" or
"Invalid username/password."

- On the Select Components screen, create a new prefix and select the
components to be associated with this deployment:
. Create a New Prefix: ecm
. Components: Select only the components for which you intend to create
schemas. Under Oracle AS Repository Components - Enterprise Content
Management, choose these components: (Webcenter Content) - Complete
. Click Next.

Note: If you entered everything correctly, a dialog box will display with the
words "Operation Completed." If so, click OK. If not, you will see an
error under Messages that you will need to resolve before continuing.
- On the Schema Passwords screen, ensure that Use same passwords for all
schemas is selected. This password will be used in a later step for Content
Server to connect to this database schema, and click Next.

- On the Map Tablespaces screen, click Next.

Note: When the warning dialog box appears, click OK.
The tablespace creation results should appear in a dialog with the text
"Operation completed." Click OK.
- On the Summary screen, click Create.

- On the Completion Summary screen, click Close.
----------------------------------------------------------------------------------------
3. Installing and Configuring ECMHOST1:
3.1 Start Installing Oracle WebLogic Server on ECMHOST1
These are the steps:
- Install Oracle WebLogic Server
- On the Welcome screen, click Next.

- On the Choose Middleware Home Directory screen, choose a directory on
your computer into which the Oracle WebLogic software is to be installed.
For the Middleware Home Directory, specify this value as example:
../app/oracle/product/fmw and Click Next.

- On the Register for Seurity Updates screen, enter your "My Oracle Support"
User Name and Password.

- On the Choose Install Type screen, a window prompts you to indicate
whether you want to perform a complete or a custom installation. Choose
Typical or Custom, then Click Next.

- On the Choose Product Installation Directories screen, specify the
Installation directory, (no Spaces is highly recommended).
- On the Installation Summary screen, the window contains a list of the
components you selected for installation, along with the approximate
amount of disk space to be used by the selected components once
installation is complete. Click Next.

- Browse for the local JDK and add it.

- Confirm Product Installation Directories Screen will appeared, after you
validate Click Next.

- On the Installation Complete screen, uncheck the Run Quickstart checkbox,
Then Click Done.

------------------
3.2 Start Installing Oracle ECM on ECMHOST1
Follow these instructions to start the Oracle Enterprise Content Management
(Oracle ECM) installer:
- Run the ECM installer
. On UNIX (Linux in the following example):
./runInstaller -jreLoc file-specification-for-jdk6
. On Windows:
setup.exe
- Specify the JRE location, for example: ...\Java\jdk160_11

- On the Welcome screen, click Next.

- On the Prerequisite Checks screen, the installer completes the prerequisite
check. If any fail, fix them and restart your installation and Click Next.

- On the Specify Installation Location screen, specify your software location,
and Click Next.

- On the Installation Summary screen, review the selections to ensure that
they are correct (if they are not, click Back to modify selections on previous
screens), and click Install.

Note: On the Installation Progress screen on UNIX systems, a dialog box
appears that prompts you to run the oracleRoot.sh script. Open a
window and run the script, following the prompts in the window and
Click Next.
- On the Installation Complete screen, click Finish to confirm your choice to
exit.
------------------
3.3 Create a High Availability Domain
To start the Oracle Fusion Middleware Configuration Wizard:- On UNIX (Linux in the following example): ECM_HOME/common/bin/config.sh
- On Windows: ECM_HOME/config.cmd
Follow these steps in the Configuration Wizard to create and configure the
Oracle ECM domain on the computer:
- On the Welcome screen, select Create a new WebLogic domain and Click
Next.

- On the Select Domain Source screen, select the applications that you want
to install, in our example:
Oracle Universal Content Management - Content Server - 11.1.1.0
Other products such as Oracle JRF and Oracle Enterprise Manager will also
be automatically selected.

- On the Specify Domain Name and Location screen, make these entries:
. Change the domain name to ecmdomain or use the default, base_domain.
. A directory will be created for this domain for the domain location and
application location.

- On the Configure Administrator Username and Password screen enter the
following:
. In the Username field, enter a user name for the domain administrator
or use the default username, weblogic.
. In the Password field, enter a user password that is at least 8
characters, for example: welcome1
. In the Configure User Password field, enter the user password again.
. You can add description, then Click Next.

- On the Configure Server Start Mode and JDK screen:
. WebLogic Domain Startup Mode: Select Your Mode.
. JDK Selection: Choose a JDK from the list of available JDKs or accept the
default.
. Click Next.

- On the Configure JDBC Component Schema screen:
. Select both schemas and choose to configure as Oracle RAC.
. For each database schema listed under Component Schema, Click the
checkbox in front of the schema to select that row.
. Verify the values in the input field near the top: Enter the schema name,
password, Oracle RAC hosts, ports, and service names.
. Click Next.

- On the Test Component Schema screen, the Configuration Wizard will test
every schema listed on the previous screen. If all of them are specified
correctly, you will see checkmarks in the Status column. If any are
incorrect, the Status column will show a stop sign and the error messages
will appear in the Connection Result Log. If this happens, click Previous to
go back and fix the problem or problems: After every schema is specified
correctly, click Next.
- Select JMS Distributed Destination, Administration Server and Managed
Servers, Clusters and Machines, the Click Next.

- In the Configure the Administration Server screen, enter the following
values:
. Name: AdminServer
. Listen address: Enter a host or virtual hostname.
. Listen port: 7001
. SSL listen port: Not applicable.
. SSL enabled: Leave this checkbox unselected.
. Click Next.

- On the Configure Managed Servers screen, add an additional Managed
Server for each of the existing Servers. For example, add an WLS_UCM2 to
match WLS_UCM1. The Listen Port for the second Managed Server should
be the same as the first. Set the Listen Address for all the servers to the
host name that the Managed Server runs on.
For example:
. WLS_UCM1
. Listen Address: ECMHOST1
. Listen Port: 16200
. WLS_UCM2
. Listen Address: ECMHOST2
. Listen Port: 16200
. Do this for all the Managed Servers
. Click Next

- On the Configure Clusters screen, create a cluster for each pair of servers.
In our example, for UCM:
. Name: UCM_Cluster
. Cluster Messaging Mode: unicast
. Multicast Address: Not applicable
. Multicast Port: Not applicable
. Cluster Address: Not applicable
. Click Next

- On the Assign Servers to Clusters screen, assign each pair of Managed
Servers to the newly created cluster:
UCM Cluster:
. WLS_UCM1
. WLS_UCM2
. Do this for all the clusters you created in the previous step in this section.
. Click Next.

- On the Configure Machines screen, click the Machine tab, and add the
following machines:
. ECMHOST1
. ECMHOST2

- On the Assign Servers to Machines screen:
. To the ECMHOST1 machine, assign the AdminServer and all *1 Servers
(WLS_UCM1).
. To the ECMHOST2 machine, assign all the *2 Servers (WLS_UCM2).

- On the Configuration Summary screen, click Create to create the domain.

- After Finished Click Done and uncheck the start admin server.

------------------
3.4 Start the Administration Server and the Managed Servers on ECMHOST1
- Start the Administration Server:
DOMAIN_HOME/bin/startWebLogic.cmd
- Configure and start the Node Manager:
ECMHOST1: MW_HOME/oracle_common/common/bin/setNMProps.cmd
ECMHOST1: MW_HOME/wlserver 10.3/server/bin/startNodeManager.cmd
- Access the Administration Console at
http://ECMHOST1:7001/console.
- In the Administration Console, start the WLS_UCM1 managed
------------------
3.5 Disabling Host Name Verification for the Administration Server and the
Managed Servers for ECMHOST1 and ECMHOST2
This step is required if you have not set up SSL communication between the
Administration Server and the Node Manager. If SSL is not set up, you receive
an error message unless you disable host name verification.
You can re-enable host name verification when you have set up SSL
communication between the Administration Server and the Node Manager.
- To disable host name verification on ECMHOST1:
1. In Oracle WebLogic Server Administration Console, select Servers, and
then AdminServer.
2. Select SSL, and then Advanced.
3. In the Change Center, click Lock and Edit.
4. When prompted, save the changes and activate them.
5. Set Hostname Verification to None.
6. Select WLS_UCM1, SSL, and then Advanced.
7. Set Hostname Verification to None.
8. Restart the AdminServers and all the Managed Servers ( WLS_UCM1).
- To disable host name verification on ECMHOST2:
1. In Oracle WebLogic Server Administration Console, select WLS_UCM2,
SSL, and then Advanced.
2. Set Hostname Verification to None.
3. Repeat Steps 1 and 2 for WLS_Portlet2 and WLS_Services2.
4. Restart the AdminServers and all the Managed Servers ( WLS_UCM2).
------------------
3.6 Configure the WLS_UCM1 Managed Server
Access the WLS_UCM1 configuration page at http://ECMHOST1:16200/cs.After you log in, the configuration page opens. Oracle UCM configuration files must be on a shared disk. This example assumes that the shared disk is at ../app/oracle/admin/domainName/ucm_cluster.
Set the following values on the configuration page to the values below:
• Content Server Instance Folder:
.../app/oracle/admin/domainName/ucm_cluster/cs
• Native File Repository Location:
.../app/oracle/admin/domainName/ucm_cluster/cs/vault
• Web Layout Folder:
.../app/oracle/admin/domainName/ucm_cluster/cs/weblayout
• Server Socket: Port 4444
• Socket Connection Address Security Filter: Set to a pipe-delimited list of
localhost and HTTP Server Hosts: 127.0.0.1|WEBHOST1|WEBHOST2
• WebServer HTTP Address: Set to the host and port of the load balancer
HTTP: ecm.mycompany.com:80
To apply these updates, click Submit and restart the WLS_UCM1 managed
server.
--------------------------------------------------------------------------------------
4. Installing and Configuring WEBHOST1
4.1 Installing Oracle HTTP Server on WEBHOST1
Note: Ensure that port 7777 is not in use by any service on WEBHOST1 by
issuing these commands for the operating system you are using. If a
port is not in use, no output is returned from the command.
. On UNIX: netstat -an | grep "7777"
. On Windows: netstat -an | findstr :7777
If the port is in use (if the command returns output identifying the port), you
must free the port.
On UNIX: Remove the entries for port 7777 in the /etc/services file and restart
the services, or restart the computer.
On Windows: Stop the component that is using the port.
Installing Oracle HTTP Server on WEBHOST1 Steps:
- Copy the staticports.ini file from the Disk1/stage/Response directory to a
temporary directory.
- Edit the staticports.ini file that you copied to the temporary directory to
assign the following custom ports (uncomment the line where you specify
the port number for Oracle HTTP Server):
# The port for Oracle HTTP server to Oracle HTTP Server port = 7777
- Start the Oracle Universal Installer for Oracle Fusion Middleware 11g Web
Tier Utilities CD installation as follows:
. On UNIX, issue this command: runInstaller
. On Windows, double-click setup.exe
- The runInstaller and setup.exe files are in the../install/platform directory,
where platform is a platform such as Linux or Win32.
- On the Specify Inventory Directory screen, enter values for the Oracle
Inventory Directory and the Operating System Group Name.
. For example:
Specify the Inventory Directory: ../app/oraInventory
Operating System Group Name: oinstall
A dialog box opens with the following message:
"Certain actions need to be performed with root privileges before the
install can continue. Please execute the script
.../app/oraInventory/createCentralInventory.sh now from another
window and then press "Ok" to continue the install.
If you do not have the root privileges and wish to continue the install
select the "Continue installation with local inventory" option
Log in as root and run the
.../app/oraInventory/createCentralInventory.sh This sets the required
permissions for the Oracle Inventory Directory and then brings up the
Welcome screen.
- On the Welcome screen, click Next.
- On the Select Installation Type screen, select Install and Configure and click
Next.
- On the Prerequisite Checks screen, the installer completes the prerequisite
check. If any fail, fix them and restart your installation.
- Click Next.
- On the Specify Installation Location screen:
. On WEBHOST1, set the Location to: ../app/oracle/admin
. Click Next.
. On the Configure Components screen:
. Select Oracle HTTP Server.
. Select Associate Selected Components with Weblogic Domain.
. Click Next.
. On the Specify WebLogic Domain screen:
. Enter the location where you installed Oracle WebLogic Server. Note that
the Administration Server must be running.
. Domain Host Name: ECMHOST1
. Domain Port No: 7001
. User Name: weblogic
. Password: ******
. Click Next.
- On the Specify Component Details screen:
. Enter the following values for WEBHOST1:
. Instance Home Location: ../app/oracle/admin/ohs_inst1
. Instance Name: ohs_inst1
. OHS Component Name: ohs1
. Click Next.
- On the Specify Webtier Port Details screen:
. Select Specify Custom Ports. If you specify a custom port, select Specify
Ports using Configuration File and then use the Browse function to select
the file.
. Enter the Oracle HTTP Server port, for example, 7777
. Click Next.
- On the Oracle Configuration Manager screen, enter the following:
. Email Address: Provide the email address for your My Oracle Support
account
. Oracle Support Password: Provide the password for your My Oracle
Support account.
. I wish to receive security updates via My Oracle Support: Click this
checkbox.
- On the Installation Summary screen, ensure that the selections are correct.
If they are not, click Back and make the necessary fixes. After ensuring that
the selections are correct, click Next.
- On the Installation Progress screen on UNIX systems, a dialog appears that
prompts you to run the oracleRoot.sh script. Open a window and run the
script, following the prompts in the window.
- Click Next.
- On the Configuration Progress screen, multiple configuration assistants are
launched in succession; this process can be lengthy.
- On the Configuration Completed screen, click Finish to exit.
------------------
4.2 Configuring Oracle HTTP Server on WEBHOST1
After installing Oracle HTTP Server on WEBHOST1, add the following lines to
the OHS_HOME/instances/ohs_instance1/config/OHS/ohs1/mod_wl_ohs.conf
file:
# UCM
(Location /cs)
WebLogicCluster ecmhost1:16200,ecmhost2:16200
SetHandler weblogic-handler
WLCookieName JSESSIONID
(/Location)
(Location /adfAuthentication)
WebLogicCluster ecmhost1:16200,ecmhost2:16200
SetHandler weblogic-handler
WLCookieName JSESSIONID
(/Location)
# AXF WS Invocation
(Location /axf-ws)
SetHandler weblogic-handler
WebLogicCluster ECMHOST1VHN1:16000,ECMHOST2VHN1:16000
(/Location)
These lines configure Oracle HTTP Server on WEBHOST1 to route requests to the clustered applications on ECMHOST1 and ECMHOST2.
----------------------------------------------------------------------------------------
5. Configuring the Load Balancer
Configure the load balancer so that the virtual host (for example, ucm.mycompany.com) routes to the available Oracle HTTP Servers using round-robin load balancing.
You should also configure the load balancer to monitor the HTTP and HTTPS listen ports for each Oracle HTTP Server.
Verify that Oracle Content Server can be accessed at http://WEBHOST1:7777/cs.
----------------------------------------------------------------------------------------
6. Installing and Configuring ECMHOST2
6.1 Installing Oracle WebLogic Server on ECMHOST2 Steps:
To install Oracle WebLogic Server on ECMHOST2, perform the steps "Installing
Oracle WebLogic Server on ECMHOST1" on ECMHOST2.
------------------
6.2 Installing ECM on ECMHOST2
To install Oracle ECM on ECMHOST2, perform the steps in "Oracle ECM on ECMHOST1" on ECMHOST2.
------------------
6.3 Using pack and unpack to Join the Domain on ECMHOST1
The pack and unpack commands are used to enable the WLS_UCM2 managed
server on ECMHOST2 to join the ECM domain on ECMHOST1.
First, execute the pack command on ECMHOST1:
pack -managed=true
-domain=../app/oracle/product/WLS/11G/user_projects/domains/ecmdomain
-template=ecm_template.jar -template_name="my ecm domain"
After copying the ecm_template.jar file to ECMHOST2,
execute the unpack command on ECMHOST2:
unpack - domain=/u01/app/oracle/product/WLS/11G/user_projects/domains/ecmdomain -template=ecm_template.jar
------------------
6.4 Start Node Manager and the WLS_UCM2 Server on ECMHOST2
To start Node Manager on ECMHOST2, use this command:
ECMHOST2: MW_HOME/oracle_common/common/bin/setNMProps.cmd
ECMHOST2: WL_HOME/wlserver_10.3/bin/startNodeManager.cmd
Access the Administration Console at http://ECMHOST1:7001/console. In the Administration Console, start the WLS_UCM2 managed server.
------------------
6.5 Start the Managed Servers on ECMHOST2
Access the Administration Console at http://ECMHOST2:7001/console. In the Administration Console, start the WLS_UCM2 managed servers.
------------------
6.6 Configure the WLS_UCM2 Managed Server
Access the WLS_UCM2 configuration page at http://ECMHOST2:16200/cs.
After you log in, the configuration page opens. The Oracle UCM configuration
files must be on a shared disk. This example assumes that the shared disk is
at/orashare/orcl/ucm.
Set the following values on the configuration page to the values below:
• Content Server Instance Folder: .../orashare/orcl/ucm/cs/
• Native File Repository Location: .../orashare/orcl/ucm/cs/vault/
• WebLayout Folder: .../orashare/orcl/ucm/cs/weblayout/
• Server Socket: Port 4444
• Socket Connection Address Security Filter: Set to a pipe-delimited list of
localhost and HTTP Server Hosts: 127.0.0.1|WEBHOST1|WEBHOST2
• WebServer HTTP Address: Set to the host and port of the load balancer
HTTP: ucm.mycompany.com:80
After making these updates, click Submit and then restart the WLS_UCM2
managed server.
----------------------------------------------------------------------------------------
7. Installing and Configuring WEBHOST2
7.1 Installing Oracle HTTP Server on WEBHOST2
This section describes how to install Oracle HTTP Server on WEBHOST2.
- Ensure that the system, patch, kernel and other requirements are met.
Note:These are listed in the Oracle Fusion Middleware Installation
Guide for Oracle Web Tier in the Oracle Fusion Middleware
documentation library for the platform and version you are using.
- Ensure that port 7777 is not in use by any service on WEBHOST2 by issuing
these commands for the operating system you are using. If a port is not in
use, no output is returned from the command.
- Copy the staticports.ini file from the Disk1/stage/Response directory to a
temporary directory.
- Edit the staticports.ini file that you copied to the temporary directory to
assign the following custom ports (uncomment the line where you specify
the port number for Oracle HTTP Server):
# The port for Oracle HTTP server to Oracle HTTP Server port = 7777
- Start the Oracle Universal Installer for Oracle Fusion Middleware 11g Web
Tier Utilities CD installation as follows:
. On UNIX, issue this command: runInstaller
. On Windows, double-click setup.exe
The runInstaller and setup.exe files are in the ../install/platform directory,
where platform is a platform such as Linux or Win32.
This displays the Specify Oracle Inventory screen.
- On the Specify Inventory Directory screen, enter values for the Oracle
Inventory Directory and the Operating System Group Name.
- On the Welcome screen, click Next.
- On the Select Installation Type screen, select Install and Configure, and
click Next.
- On the Prerequisite Checks screen, the installer completes the prerequisite
check. If any fail, fix them and restart your installation.
- Click Next.
- On the Specify Installation Location screen set the Location to:
.../app/oracle/admin
- Click Next.
- On the Configure Components screen:
. Select Oracle HTTP Server.
. Select Associate Selected Components with Weblogic Domain.
- Click Next.
- On the Specify WebLogic Domain screen:
Enter the location where you installed Oracle WebLogic Server. Note that
the administration Server must be running.
. Domain Host Name: ECMHOST1
. Domain Port No: 7001
. User Name: weblogic
. Password: ******
. Click Next.
- On the Specify Component Details screen enter the following values for
WEBHOST2:
. Instance Home Location: .../app/oracle/admin/ohs_inst2
. Instance Name: ohs_inst2
. OHS Component Name: ohs2
. Click Next.
- On the Specify Webtier Port Details screen:
. Select Specify Custom Ports. If you specify a custom port, select Specify
Ports using Configuration File and then use the Browse function to select
the file.
. Enter the Oracle HTTP Server port, for example, 7777
. Click Next.
- On the Oracle Configuration Manager screen, enter the following:
. Email Address: Provide the email address for your My Oracle Support
account
. Oracle Support Password: Provide the password for your My Oracle
Support account.
. I wish to receive security updates via My Oracle Support: Click this
checkbox.
- On the Installation Summary screen, ensure that the selections are correct.
If they are not, click Back and make the necessary fixes. After ensuring that
the selections are correct, click Next.
- On the Installation Progress screen on UNIX systems, a dialog appears that
prompts you to run the oracleRoot.sh script. Open a window and run the
script, following the prompts in the window.
- Click Next.
- On the Configuration Progress screen, multiple configuration assistants are
launched in succession; this process can be lengthy.
- On the Configuration Completed screen, click Finish to exit.
------------------
7.2 Configuring Oracle HTTP Server on WEBHOST2
To configure Oracle HTTP Server on WEBHOST2, follow the instructions in
Section "Configuring Oracle HTTP Server on WEBHOST1" on WEBHOST2.
------------------
7.6 Configuring Server Migration Targets
This section describes how to configure server migration targets. You first
assign all the available nodes for the cluster's members and then specify
candidate machines (in order of preference) for each server that is configured
with server migration. Follow these steps to configure cluster migration in a
migration in a cluster:
1. Log in to the Oracle WebLogic Server Administration Console
(http://Host:Admin_Port/console). Typically, Admin_Port is 7001 by default.
2. In the Domain Structure window, expand Environment and select Clusters.
3. Click the cluster for which you want to configure migration (UCM_Cluster) in
the Name column of the table.
4. Click the Migration tab.
5. In the Change Center, click Lock and Edit.
6. In the Available field, select the machine to which to allow migration and
click the right arrow. In this case, select ECMHOST1 and ECMHOST2.
7. Select the data source to be used for automatic migration. In this case,
select the leasing data source.
8. Click Save.
9. Click Activate Changes.
10. Set the candidate machines for server migration. You must perform this
task for all of the managed servers as follows:
. In the Domain Structure window of the Oracle WebLogic Server
Administration Console, expand Environment and select Servers.
Tip: Click Customize this table in the Summary of Servers page and
move current Machine from the Available window to the Chosen
window to view the machine on which the server is running. This will
be different from the configuration if the server gets migrated
automatically.
. Select the server for which you want to configure migration.
. Click the Migration tab.
. In the Available field, located in the Migration Configuration section, select the machines to which to allow migration and click the right arrow..
. select ECMHOST1.
. Select Automatic Server Migration Enabled. This enables Node Manager to start a failed server on the target node automatically.
. Click Save.
. Click Activate Changes.
. Restart the administration server, node managers, and the servers for
which server migration has been configured.
Enjoy,
Mohammad K. Faidi
"Think Positive"
No comments:
Post a Comment