Quick Search,,,

Sunday, January 24, 2016

How to upgrade Oracle Webcenter Content from 11.1.1.5 to 11.1.1.8?

GOOD DAY,,,

To upgrade Oracle WebCenter Content from 11.1.1.5 to 11.1.1.8 there are some important steps to do so, please go inside these instructions,,,

Pre Upgrade Steps:
1. Download Oracle Webcenter Content 11.1.1.8 from my oracle support
    ofm_wcc_generic_11.1.1.8.0_disk1_1of2.zip
    ofm_wcc_generic_11.1.1.8.0_disk1_2of2.zip
2. Upgrade Oracle Weblogic to 10.3.6  
3. Backup Oracle ECM  home folder , Inventory directory and database.
4. Shutdown below services:
    Admin Server , All Manage server and Node Manager.
5. Unzip the patch. 
6. Now we can go through the upgrade steps.

-----------------------------------------------------------------------------------

Upgrade Oracle ECM Home:
1. Use the command prompt to run runinstaller setup.exe from 
    UCM11.1.18/Disk1 and don't forget to determine the location of the JDK 
    directory.

2. On Welcome Screen click Next.


3. Select radio button Skip Software Updates and click Next.

4.  Make sure it passes all per-requisites checks. Once done click Next.


5. In the Specify Installation Location screen make sure the Oracle Middleware 
    Home and Oracle HomeDirectory are correct for the WCC
    Oracle Home Directory=Oracle_ECM1(Default name)
    Oracle Middleware Home=$MW_HOME

6. Click Yes to confirm with Upgrade.

7. In the Application Server screen the Weblogic Server radio button should be 
    checked, click the Next button.

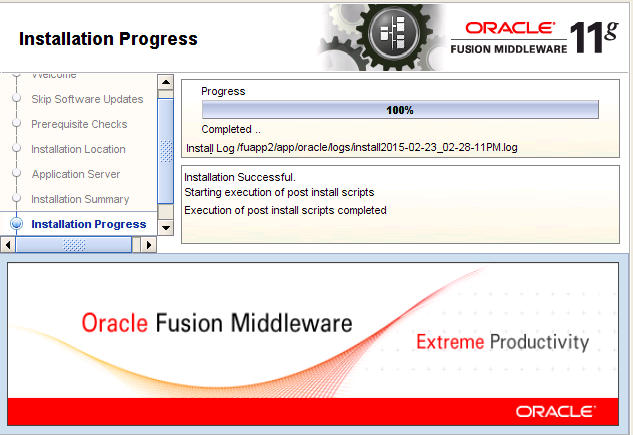
8.  In the Installation Summary screen click the Install button.
9.  When the Progress is 100% click the Next button.

10. Click the Finish button.

-----------------------------------------------------------------------------------
Upgrade Web Center Content Schema:
1. Execute ./psa from $MW_HOME/oracle_common/bin in GUI mode.
2. Click Next

3. In Select Component field select the schema that you wish to upgrade . In 
    our case we had only OCS schema and hence only that was selected and 
    click Next.

4. Make sure per-requisites are completed and click Next.

5. In Content Server Directory , browse domain location of content server.
    Eg:$MW_HOME/user_projects/domain/$DOMAIN_NAME.

6. Enter schema details for 'XXX_OCS' user
    Connect String: DBHostaName:DBPort/DBName
    DBA User Name: sys as sysdba
    DBA Password : Password for sysdba
    Schema User Name : Dropdown list and select 'XXX_OCS' user
    Schema Password : Password of 'XXX_OCS' user


7.  Click Next once succeeded.


8. Confirm everything and click Upgrade.
9. Check status and once 100% completed,click Done.


10. Login to database and confirm that 'XXX_OCS' schema has been upgraded 
      to 11.1.1.8 with below command: 
     "Select owner,version,status,upgraded from schema_version_registry"

      Expected Output:
      XXX_OCS                        11.1.1.8.0                     VALID       Y


Enjoy,
Mohammad K. Faidi
  "Think Positive"

Monday, January 11, 2016

How to export or migrate a specific folders from your folder structure in oracle webcenter content with or without contents?

GOOD DAY,,,

In Some cases, you need to export or migrating a specific folders from your folder structure with their contents or sometimes without their contents from one WebCenter Content instance to another. 

In this Post the folder architecture in this example is Folders_g. Although Framework Folders is the recommended folders component for WebCenter Content 11g. 

To prepare, you must first have the FoldersStructureArchive component enabled on both the source and target instances.  
In addition to enabling the component, there is a configuration flag to set.  By default, the config variable ArchiveFolderStructureOnly is set to false which means content will be exported along with the folders, so that can be left.
The config variable AllowArchiveNoneFolderItem is set to true by default which means it will export content both in the folder structure as well as those not selected...or even outside of folders.
Basically, it means you must use the Export Criteria in the archive to control the content to export either you want or you don't want to export any contents with the selected folders you can use Export query. 
In our use case, we only want the content within the folders we select, so the configuration should be set as AllowArchiveNoneFolderItem=false. Now only content that is in our selected folders will get exported into the archive. This can be set in the General Configuration in the Admin Server.
You will also need to make sure the custom metadata fields on both instances is identical. If they are mismatched, the folders will not import into the target instance correctly. You can use the Configuration Migration Utility to migrate those metadata fields. 

Once the component is enabled and configurations set we can begin our export or migrating process:
   1. go to Administration - Admin Applets - Archiver and select Edit - Add... 
       to create a new archive.  


2. Now that the archive is established, go back to the browser and login your webcenter 
        content then go to: 
        Administration - Folder Archiver Configuration.
        For the Collection Name, it will default to the local collection.  Change this if your 
        archive is in a different collection in our example it's ExportFoldersAndFiles.
        Select your Archive Name from the list.


   3. Expand the folder hierarchy and you can now select the specific folder(s) you want to 
         migrate.  

        Note: The thing to keep in mind are the parent folders to the ones you are selecting.  If 
                  the idea is you want to migrate a certain section of the folder hierarchy to the 
                  other server and you want it to be in the same place in the target instance, you 
                  want to make sure that the parent folder already exists in the target.  It is 
                  possible to migrate a folder and place it within a different parent folder in the 
                  target instance, but then you need to make sure you set the import maps 
                  correctly to specify the destination folder.


   4. Once they are selected, click the Add button to save the configuration.  This will add 
         the right criteria to the archive. 

   5.  Now go back to the Archiver applet.  Highlight the archive and select Actions - Export. 
        Be sure 'Export Tables' is selected.  

       NoteIf you try using the Preview on either the contents or the Table data, both will 
                show everything and not just what you selected. This is normal. The filtering of 
                content and folders is not reflected in the Preview. Once completed, you can click 
                on the View Batch Files... button to verify the results. You should see an entry for 
                the Collections_arTables and one or more for the content items.  

   6. Once you have the archive exported, you need to transfer it from the source to the 
       target instance.

       Important Note: If you don't have the outgoing providers set up or your target server on 
                                 another server that you don't have any connection to do the transfer
                                 you can sometimes copy over the archive folder from 
                                 (cs instance dir)\archives\(archive name) directly over to the other 
                                 instance. Then manually modify the collection.hda file on the target to
                          let it know about the archive for more details about this step
                          please read my post "Export contents from oracle UCM instance 
                                 and import them into deferent UCM instance server without using 
                                 replication or transferring data "Click here to Read more"

   7. Before import you need to edit value map - "Edit Value Maps", here you can add your 
      query map values into your target server. 

      Important Note: Be sure to add the value of the dCollectionID of the parent 
                                       folder from the source instance in the Input ValueFor the Field
                                       you want to change this to be the dParentCollectionID. And for 
                                       the Output Value, you want this to be the dCollectionID of 
                                       the parent folder in the target instance.
   This will now map the folders into the correct location on target.

   8. The archive is now ready to be imported.  Click on Actions - Import and be sure the 
         'Import Tables' check-box is checked.  
         
                           
Enjoy,
Mohammad K. Faidi
  "Think Positive"

Sunday, January 10, 2016

How to export contents from oracle UCM instance and import them into deferent UCM instance server without using replication or transferring data?

GOOD DAY,,,

In some cases you need to export huge number of contents from oracle UCM instance and import them into deferent offline UCM instance server without using replication or transferring data because you don't have any connection to that server and also you need to link these contents to deferent folder structure, new security group, new account with new privileges.

All these points can be done easily and it will be very useful if you are configuring new test environment with new structure and you need a real data from your production server.

First let say we need to export contents from (server 1) to (server 2), where 
server 1 is the production server, and Server 2 is our offline target server. 
In this instruction we will use two main steps 
1. Export contents from Server 1
2. Import contents to Server 2  

----------------------------------------------------------------------------------------
Instruction:
1. Export content from Server 1:
    - Go to Administration - Admin Applet - Archiver
    - Click on Edit - Add
    

    - Add new name for your Archive name, let say (Export_Contents)you can 
      add a description, then click OK.
   

    - Be sure that Copy Web Content option is Yes from Export Option.


    -  Now from (Export Data) Tab, Click on Edit in the Export Query screen. 


    - After you click Edit, we will add our export query to get the exact 
      contents that we need from server 1, in my scenario I will add a query
      using Folder Xcollection ID that contain my data, you can add any query 
      you need depend on your data, After that Click OK.


 -  Right Click on your archive name and click ExportDon't Click on Delete 
    revision after successful archive, and Click OK.


    - After your Export Finished Successfully, go to this location:
      ...\Middleware\user_projects\domains\base_domain\ucm\cs\archives 
      You will find your archive name folder their which in our scenario 
      (Export_Contents), Copy this folder to the same path in Server 2 to 
      begin our import process. 


----------------------------------------------------------------------------------------

2. Import contents to Server 2
    - First we need to copy (Export_Contents) folder from Server 1 as we   
      mentioned before and paste this folder on the same location in Server 2, 
      ...\Middleware\user_projects\domains\base_domain\ucm\cs\archives

    Very Important Notes before Import: 
    If you don't do these points the indexer will abort the new contents 
    and it will not be imported, with a message "import failed with too   
    many errors"
    1. You need to create the same Security Group name and Content 
        Type and meta data that was linked with the exported contents from 
        Server 1 and add them in Server 2, then give the new Security Group in 
        Server 2 full permission on this Security Group so when you import 
        these contents it will be assigned to the new one and it will be mapped 
        into the new account under new folder structure with no problems. 

    2. After you copy the archive Folder (Export_Contents) to Server 2, under 
        ...\Middleware\user_projects\domains\base_domain\ucm\cs\archives
        and then open the Archiver Utility to import this archive folder, you will 
        not see this archive name in your list, that because it's a deferent 
        instance so you must add this archive name manually from       
        collection.hda file, which located in the same path of the archive folder.


     3. Open collection.hda file using a text editter, and add the name of your   
         archive folder name manually, and don't forget to add the same 
         description on the second line before the (@end) command, if you don't 
         want to add description you must keep (Enter) space between the 
         archive name and the (@end) command as you can see in figure1 and 
         figure2.
         Figure 1 (With Description)


        Figure 2 (Without Description)
    
         4. After you finished these points, open the Archiver again from Server 2           now you can see your archive folder name and begin Import process.

Proceed now with our Import Process:
    - First we need to add the mapping Query after select your archive name.
    - Click on Import tab - Content - Value Map Click Edit

    - A Dialog box will appeared called "Edit Value Maps", here you can add your 
      query map value into your target server (i.e Server 2), in my scenario I 
      will check all contents into a new specific folder using a new Xcollection ID 
      as you can see in the figure.
   - Final step right click on your archive name, Click on Import
After your Import Successfully finished, all Contents move to the new instance, new folder structure, new security group and accounts with new privileges and finally all contents are indexed and released. 

Enjoy,
Mohammad K. Faidi
  "Think Positive"